


Now we come to know the term in computer assembly
1. CasingThe place or the home of all computer hardware.
2. CPU / ProcessorCentral Processing Unit (UPS) (English: Central Processing Unit; CPUs), refers to computer hardware that understand and execute commands and data from the software. Another term, processors / processor (processor), is often used to refer to the CPU.
3. RAM
Random access memory (English: Random access memory, RAM) is a type of computer storage whose contents can be accessed in a fixed time not considering the location of data in memory. This is in contrast to sequential memory devices such as magnetic tape, disk and drum, in which the mechanical movement of the storage media to force the computer to access data sequentially.
4. Hard Disk
Hard disk (English: hard drive or hard disk drive HDD or hard drive abbreviated abbreviated HD) is a hardware component that stores secondary data and contains magnetic disks.
5. Optical Device (VCD / DVD)
Enhancements to Input data using Optic such as VCD and DVD
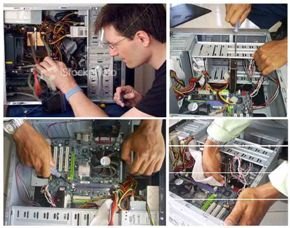
How to Assemble Complete Computer
1. Preparation Assemble Computer• Wear gloves to avoid contact with electronic goods, in order to avoid short-circuit,• Use lightweight sandals to avoid shock• Determination of the Computer Configuration• Preparation Kompunen and equipment
Security• Prepare a container to store small benda2;• Prepare equipment such as screwdrivers, etc.• Computer Components• Completeness of components such as cables, screws, jumpers, bolts, etc.• User manual and reference of the component• Tools such as flat and philips screwdriver• kompunen Determine what you want to use either hardware or software
2. Computer Assembling Process• Preparation motherboard• Installing the processor• Installing the heatsink• Installing a Memory Module• attach the motherboard to the chassis• Installing the Power Supply• Installing the Motherboard Cables and Casing• Installing the Drive• Installing the Adapter Card• Final Settlement
A. Installation Mother Board
First time in the assembly stage is Mother board installation, attach motherboard to the case, and the installation of jumper must match (see User manual) Installation of jumpers that can result in permanent damage to the hardware.
B. Installing the processor
Before installing the processor is useful to study the performance of the processor slot, then after understanding, see the sign at the top prosesso and which exist in the processor, not to reverse processor (note each edition and will be different types of processors, make sure you use appropriate processor with Motherboard ).
C. Installing Heitsink
It would be rather difficult in the installation heitsink (coolant, usually there are at bubuhi salf between processors and Heitsink, topped kopas which connect the motherboard to stream of hot air from the motherboard.
D. Installing RAM MemoryThere are several types of memory such as SIMM, RIMM and DIMM, make sure the motherboard supports RAM, pair with hati2 (do not install the ram when connected to power because it can damage the components)
E. Installing the Motherboard in Casing• Attach the motherboard to the chassis Locate the holes for each holder of plastic and metal. Holes for mounting metal (metal spacer) is characterized by a ring on the edge of the hole.• Install a metal or plastic holder on the tray casing according to the position of each corresponding mounting holes on the motherboard.• Place the motherboard on the chassis so that the head holder tray out of the holes on the motherboard. Insert the locking screw on each metal holder.• Attach frame port I / O (I / O sheild) on the motherboard if any.• Install the tray casing which is mounted on the chassis and key motherboard with screws.
F. Installing the Power Supply
Attach Power suply on the chassis, and power suply plugs, on the motherboard, CD, hard drive,
G. Installing the Drive
Drive cables have SATA or ATA penghuung form (included in the purchase hardrive) connect the cable from the drivr (DVD, hard disk, floppy) to the motherboard and do not forget slot of the power supply.
H. Installing the Adapter Card
Card adavter or more gracious in calling VGA, some or most of the motherboard using the onboard option (VGA means it is already in the motherboard) if not onboard VGA Installation is very easy, just like the other times when installing cables.
I. Final Settlement
• Replace the chassis cover by sliding• Connect the cable from the power supply to the wall socket.• Connect the monitor to the video card port.• Connect the phone cable to the modem port if any.• Connect the keyboard cable connector and plug the mouse into the mouse port or serial poert (depending on the type of mouse).• Connect external devices such as speakers, joystick, and microphone if any to the appropriate port. Check the manual of the adapter card to ascertain the location of the port.
Testing after assembling a computer1. Turn on the monitor and the system unit. Note the display monitor and the sound from the speakers.2. Program fost of the BIOS will automatically detect the installed hardware computer. If there are errors then the display is blank and the speakers emit a beep on a regular basis as an indication of the error code. Check the BIOS reference code to find the error indication is the beep code.3. If no error occurs then the monitor displays the execution of the POST program. Press the button interrupts the BIOS per the instructions on the screen to enter the BIOS setup program.4. Check out all the results of hardware detection by the BIOS setup program. Some settings may have changed its value, especially hard drive capacity and the boot sequence.5. Save your changes and exit the settings of the BIOS setup.


0 komentar:
Posting Komentar